Ice Maker Water Damage: Troubleshooting Tips to Avoid a Disaster
Ice Maker Water Damage
Having an ice maker at home can be a convenient and refreshing addition to your kitchen. However, without proper maintenance and troubleshooting, it can quickly turn into a source of water damage disasters. From leaky pipes to overflowing bins, ice maker water damage can wreak havoc on your floors and cabinets if not addressed promptly.
In this article, we will guide you through some troubleshooting tips to help you avoid ice maker water damage problems. Whether you are dealing with a malfunctioning water inlet valve or a clogged ice chute, we’ve got you covered. Our aim is to equip you with the knowledge and know-how to identify and fix common issues to prevent costly ice maker water damage repairs.
With step-by-step instructions and expert advice, we will walk you through the process of troubleshooting your ice maker, ensuring that you have a seamless ice-making experience without the risk of water damage. So, if you want to safeguard your home from potential disasters caused by ice maker water damage mishaps, keep reading!
Remember, taking proactive measures and addressing ice maker water damage problems promptly can save you from the headache and financial burden of dealing with water damage.
Troubleshooting Tips for Ice Maker Issues
Ice makers are complex machines with various components that can malfunction. Understanding the common problems and their causes is the first step in troubleshooting your ice maker. Here are some of the most common ice maker problems you may encounter:
1. No ice production
If your ice maker is not producing any ice, there could be several reasons behind it. The water inlet valve may be faulty, preventing water from entering the ice maker. Another possible cause could be a clogged water line or a malfunctioning ice maker control module. Additionally, a defective ice maker thermostat or a faulty ice maker switch can also be responsible for the lack of ice production.
To troubleshoot this issue, start by checking the water inlet valve for any signs of damage. Inspect the water line for clogs or leaks. If everything seems fine, test the ice maker control module, thermostat, and switch using a multimeter. Replace any faulty components as necessary to restore ice production.
2. Leaking water
Leaking water is a common problem with ice makers and can lead to significant water damage if not addressed promptly. The most common cause of water leakage is a faulty water inlet valve. When the valve fails to close properly, water can continue to flow into the ice maker, causing it to overflow. Another possible cause of water leakage is a cracked or damaged water line.
To fix this issue, start by inspecting the water inlet valve for any signs of damage or wear. If the valve is faulty, replace it with a new one. Additionally, check the water line for any cracks or leaks. If you find any, replace the damaged section of the water line to stop the water leakage.
3. Ice cubes are too small or misshapen
If your ice cubes are coming out too small or misshapen, it could indicate a problem with the water supply or the ice maker itself. Insufficient water flow into the ice maker can result in smaller ice cubes. A clogged water filter or a faulty water inlet valve can restrict the water flow.
To troubleshoot this issue, start by checking the water supply to the ice maker. Ensure that the water pressure is adequate and that the water filter is not clogged. If the water supply is fine, inspect the water inlet valve for any issues. Replace any faulty components to improve the water flow and achieve properly formed ice cubes.
Remember, these are just a few examples of common ice maker problems. Depending on the make and model of your ice maker, you may encounter other issues as well. It’s important to refer to your ice maker’s manual or consult a professional if you’re unsure about any troubleshooting steps.
Signs of Water Damage Caused by Mishaps
Preventive maintenance is key to keeping your ice maker in top shape and avoiding water damage disasters. Here are some preventive maintenance tips to follow:
1. Clean the ice maker regularly
Regularly cleaning the ice maker helps prevent mineral deposits and clogs. Follow the manufacturer’s instructions for cleaning and use a mild cleaning solution. Remove any ice buildup and debris from the ice bin and dispenser. Wipe down the exterior of the ice maker to keep it clean and free from dust.
2. Replace the water filter as recommended
If your ice maker has a water filter, make sure to replace it as recommended by the manufacturer. A clogged water filter can affect the ice maker’s performance and lead to water quality issues. Regularly replacing the water filter ensures a steady flow of clean water into the ice maker.
3. Inspect the water supply line
Regularly inspect the water supply line for any leaks or damage. If you notice any issues, repair or replace the water supply line immediately. A damaged water supply line can cause water leakage and lead to costly water damage repairs.
4. Keep the area around the ice maker clean and dry
Ensure that the area around the ice maker is clean and dry at all times. Wipe up any water spills or leaks immediately to prevent water damage to your floors or cabinets. Regularly check for any signs of water leakage and address them promptly.
By following these preventive maintenance tips, you can extend the lifespan of your ice maker and minimize the risk of water damage caused by ice maker mishaps.
Steps to Take When Water Damage Occurs

Water damage caused by ice maker mishaps can be costly and disruptive. It’s essential to be aware of the signs of water damage so that you can take immediate action. Here are some common signs of water damage caused by ice maker issues:
1. Water stains or discoloration
Water stains or discoloration on walls, floors, or cabinets near the ice maker can indicate water leakage. Look out for any yellowish or brownish stains that may appear over time. These stains are a clear indication of water damage and should not be ignored.
2. Musty or moldy smell
Excessive moisture or water leaks can create the perfect environment for mold growth. If you notice a musty or moldy smell near your ice maker, it could be a sign of water damage. Mold growth can not only damage your property but also pose health risks to you and your family.
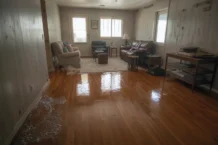
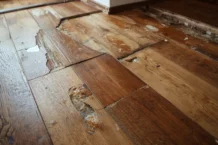
3. Warped or damaged flooring
Water leakage from an ice maker can seep into the flooring, causing it to warp or become damaged. If you notice any changes in your flooring, such as buckling or warping, it’s important to investigate the cause and address it promptly. Ignoring water damage can lead to more extensive and costly repairs in the future.
If you observe any of these signs of water damage, it’s crucial to take immediate action to prevent further damage and mitigate the risks. Addressing water damage promptly can save you from the headaches and expenses associated with extensive repairs.
Professional Help for Water Damage Restoration
Despite your best efforts in preventing water damage caused by ice maker mishaps, accidents can still happen. If you find yourself dealing with water damage, here are some steps to take:
1. Turn off the water supply
The first step in dealing with water damage is to turn off the water supply to the ice maker. Locate the shut-off valve near the ice maker and turn it off to stop the water flow. This will prevent further water damage while you assess the situation.
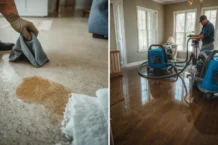
2. Remove standing water
If there is standing water on the floor, use a wet/dry vacuum or mop to remove it. Promptly removing standing water helps prevent further damage to your flooring and reduces the risk of mold growth.
3. Dry out the affected area
Once the standing water is removed, thoroughly dry out the affected area. Use fans, dehumidifiers, and open windows to increase airflow and promote drying. It’s crucial to remove any moisture to prevent mold growth and further damage.
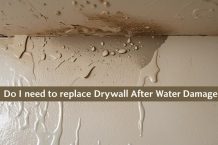
4. Assess the extent of the damage
Carefully assess the extent of the water damage. Check for any structural damage, such as weakened floors or cabinets. Inspect walls for signs of water saturation or hidden leaks. If the damage is extensive or if you’re unsure about the severity, it’s best to consult a professional water damage restoration company.
5. Document the damage
Take photos or videos of the water damage for insurance purposes. Documenting the damage can help streamline the insurance claims process and ensure that you receive proper compensation for the repairs.
6. Contact a water damage restoration professional
If the water damage is significant or if you’re unsure about the restoration process, it’s essential to contact a professional water damage restoration company. They have the expertise, equipment, and resources to properly handle the restoration process and mitigate further damage.
Remember, acting quickly when water damage occurs can make a significant difference in the extent of the damage and the cost of repairs. Don’t hesitate to seek professional help when needed.
Insurance Coverage for Ice Maker Water Damage
Dealing with water damage caused by ice maker water damage mishaps can be overwhelming. In some cases, it may be necessary to seek professional help for water damage restoration. Here’s how professional restoration companies can assist you:
1. Water extraction and drying
Professional restoration companies have specialized equipment for water extraction and drying. They can quickly remove standing water and thoroughly dry out the affected area, preventing further damage and mold growth.
2. Mold remediation
If water damage has led to mold growth, professional restoration companies can handle mold remediation. They have the expertise to identify and safely remove mold, ensuring a safe and healthy environment.
3. Structural repairs
In cases where water damage has caused structural issues, professional restoration companies can handle the necessary repairs. They have the knowledge and experience to address flooring, wall, and cabinet damage, restoring your property to its pre-damage condition.
4. Insurance claims assistance
Professional restoration companies can provide assistance with insurance claims. They can help document the damage, provide detailed reports, and communicate with your insurance company on your behalf. This ensures a smoother claims process and maximizes your chances of receiving proper compensation.
When dealing with water damage, it’s crucial to choose a reputable and experienced restoration company. Do your research, read reviews, and ask for referrals to ensure that you’re hiring a trusted professional.
Tips for Preventing Ice Maker Water Damage Mishaps in the Future
Ice maker water damage may be covered by your homeowner’s insurance policy. However, the coverage can vary depending on the policy and the circumstances of the damage. Here are some key points to consider:
1. Review your insurance policy
Review your homeowner’s insurance policy to understand the coverage for ice maker water damage. Look for specific clauses related to water damage, leaks, and appliance malfunctions. Familiarize yourself with any exclusions or limitations that may apply.
2. Contact your insurance company
If you experience ice maker water damage, contact your insurance company as soon as possible. Report the damage and provide them with the necessary documentation, such as photos and videos. They will guide you through the claims process and help determine the coverage.
3. Understand the deductible and claim process
Be aware of your insurance deductible, which is the amount you’re responsible for paying before your insurance coverage kicks in. Understand the claim process and follow the instructions provided by your insurance company. Document all communication and keep track of any expenses related to the water damage.
4. Work with a restoration company approved by your insurance
To ensure a smooth claims process, consider working with a restoration company that is approved by your insurance company. They have experience in dealing with insurance claims and can provide the necessary documentation and reports to support your claim.
Remember, every insurance policy is different, and coverage can vary. It’s essential to review your policy and consult with your insurance company to understand the specifics of your coverage.
Conclusion
Preventing ice maker mishaps is key to avoiding water damage and costly repairs. Here are some tips to help you prevent future ice maker water damage issues:
1. Regularly inspect and clean your ice maker
Regularly inspect your ice maker water damage, for any signs of wear, leaks, or damage. Clean the ice maker as recommended by the manufacturer to prevent mineral deposits and clogs. By keeping your ice maker in good condition, you can reduce the risk of malfunctions and ice maker water damage.